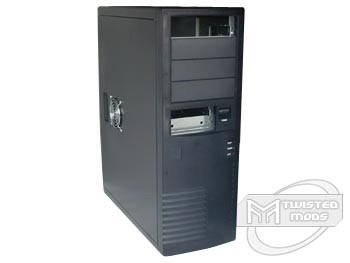
Amongst most cases today, BLACK is one of the most often seen colors. Is it because of it?s appealing look or because it blends with so many different colors of lighting? I guess that depends on who you ask, but to me, it?s just because of the colors that blend ? not to mention that it?s easily color matched for touch-ups! Today I had the chance to take a look at Koolcases.com?s "Panther" chassis. After pulling this beast from the shipping box, I realized how heavy this sucker was! This immediately tempted me to bring out the scale and to my surprise, this case only weighed 16 lbs. It seemed like this case was too heavy to be aluminum and too light to be steel so I emailed Ed, the supplier of the case and asked. He says its steel which makes sense because I have never seen an aluminum case that?s 1 mm thick. From what I could see (without opening the case yet) this case holds up to four 5.25" devices and up to two 3.5" devices. This is a pretty fair amount considering that the previously reviewed, Addtronics 6896, which stood taller only held three 5.35" devices and one 3.5" device. After pulling out the tape measure, the Panther is 21" tall and 7.5" wide ? a little less wide than I would like to see?wider usually = better cooling.

A look at the front chassis made me shiver. This case may have had one of the least appealing fronts of all time, it reminds me of an older server case, so that?s probably what I would use it for. Although the front bezel is plain BLACK with white writing, I did notice one thing that stood out in certain light positioning and that?s the transparency on the bezel. Although it appears flat black, a nice lighting job with some laser LEDs or a 4" cold cathode to make a sweet glare would really bring out the transparency of it. The power button this case is clear as well, and I must say, it?s very ? LARGE. Someone with fat fingers (not falling for this one again - Ed) could definitely maneuver right in there to power up this system! While the power button does seem a bit extreme, I was quite concerned with the size of the reset button. Running an operating system like windows 98, constantly blue screening, will have you in a mess every 5 minutes while you search for a pen to push the reset button. That?s right, it?s TINY ? even my fingernail couldn?t get in there. Along the left side of the case below the floppy bays, I was pleased to see that this case did have a spot for a case badge. More and more cases coming out these days just don?t seem to have case badge room, so I stuck one of my TwistedMods case badges on the front and moved on. On the lower portion of the front bezel is a "vented design" which hints to me that some beefy cooling is behind it, we?ll take a look at that a little later on.
As you should know by now, we normally move onto the panels and we did. After taking a look at quite a few cases I can usually tell if the case is quality or not by the texture on the side panels. Needless to say, this case had a somewhat cheesy texture, barely apparent in some spots and so far I had my mind set that this case was indeed cheap. Don?t get me wrong, price does not effect it?s strength so I decided to test this theory myself by placing all 115lbs of heaving muscle onto this case and bounce around a bit. I had all the confidence in the world that this case would not fail and it didn?t, although I could feel the top panel caving in a bit. One of the most unique things about such a plain case like this was the custom intake on the side panel. Positioned right in front of where the PCI cards are, this case housed an already installed 80mm fan with a chrome fan grill. Definitely a must have on a steel case and I give this part two thumbs up.
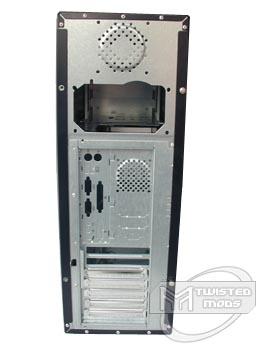
As we arrive at the final destination in the rear of the chassis, I was surprised to see such a difference from other cases! Starting at the top, I noticed an 80mm exhaust hole which is an excellent idea for extra cooling and even better for a BlackIce Micro watercooling radiator! There is only one other case which I have noticed has this exhaust hole above the PSU and that is the Lian-Li PC-70. As you may have already guessed, t;
ISU is positioned BELOW the 80mm exhaust which is kind of awkward, but since heat rises, it may have been a great idea to get rid of all the hot air being stored up top! Moving onto the power supply, I hate to break it to you, but there was no removable PSU plate. I am just waiting until ONE manufacturer hears my reviews and actually CHANGES their design. Below the PSU is the IO Plate, and to the right of that is a 40mm fan hole which looks fairly restrictive. The IO plate was made of the same steel as the case rather than being that cheesy thin metal that manufacturers usually use. You know- the IO plates that usually fall out, but this one had no problems and I was actually not able to remove it because it was so tightly installed. This case was able to hold the standard 7pci devices (as long as the motherboard allowed it). Just as I was unscrewing the chrome thumbscrews to remove the side panels, I notice that the lower portion of the back panel was loose. I started to investigate and searched Koolcases.com and found out that the motherboard plate was removable! If there?s one thing I LOVE in a case it?s a removable motherboard plate because it makes installation and un-installation of components a lot easier without having to remove all the PCI cards to take the motherboard out and reinstall a heatsink.
 ?????
?????
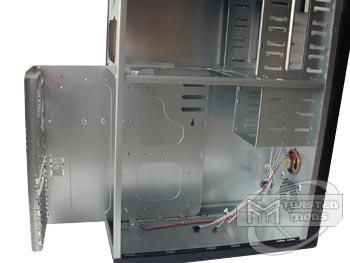
After I pulled the side panel off by sliding it towards the rear of the case I took a glance inside and noticed that a removable PSU plate is un-necessary because the power supply is in a separate section of the case. The picture will help illustrate this idea a little better. Looking inside this case things seemed pretty much the same as every other case. Other than the two section design where the top section houses the 80mm exhaust, PSU and all the 5.25" devices and the bottom houses the motherboard (components) and 3.5" drives, I noticed no significant difference. After remembering that there was a vent in the front plastic bezel I quickly investigated only to find ONE 80mm exhaust fan. I guess there was a reason for that side panel intake after all! The last thing I noticed is that this motherboard tray supports brass stand-off mounting rather than Lian-Li?s "clip-mount" design. I find the brass stand-offs to be a little more trusty as far as being less flexible and removable etc. Also- I noticed that all of the 5.35" bays are able to use the "rail-mount" design most often seen in YeongYang and Chieftec/Antec cases which makes the removing of hardware quick, easy and timely! Being in a room without much light and no tools will no longer bother you (unless you require the removal of a hard drive)!

As you may have noticed, this case would not be the most ideal LANning case. Due to the lack of cooling and weight factor, this chassis might bring nothing but problems. On the other hand, this case would make a great server chassis. Not only is it very inexpensive at $39.00, but it just plain LOOKS like a server case. Although price is often a factor amongst many modders and shoppers, don?t let that $39 fool you! Keep in mind that this case does have a design flaw with cooling which would not bode well for any over-clockers out there! If you think this case would be a great gift or you are planning on buying matching cases for ALL of your office?s new/used computers, this could be a quick and effective solution.

More Pictures on Page 2!
Next Page 2/2 >


