
I don?t know about many of you, but after a couple of months of seeing the same case, things get kind of ?boring.? It?s always a good idea to switch cases, whether it?s for the appearance or the cooling advantages (or even mod potential in my case!). Herman of Nikao.Net sales made it possible for me to show all of you guys and gals their newest case called the ?Union.? Before I receive cases, I usually examine the case?s specs on the company?s website as a little bit of a background research and indeed I did. Apparently the star features of this case are the front access USB ports along with its original lower front bezel. Fully lit, the Union looks SICK! After a couple days of wait, I received the case in full working order. No unusual dents, holes or missing parts of the shipping box (which is always a good sign). I quickly pulled the box inside the house and pulled the actual Union Chassis from the shipping box. One advantage I noticed immediately was its weight! Once again, I pulled out my trusty scale and weighed it in at about 19 lbs. For a small ATX case, that?s a hell of a lot of metal! Immediately I was hinted that this was a steel chassis, because it sure isn?t aluminum! With steel cases, you can almost always expect some sort of weight factor, but this can only mean one thing?thick metal! That?s right; I quickly shot an email over to our pal Herman and found that it is 1mm thick. With this in mind I had no problem performing the strength test, so I jumped on top of the case and gave it a little shake. Just like I suspected, no bending, denting or transforming of any metal occurred, although I could feel the top panel start to flex slightly. At this point, I will let you know that this case does have one slight problem with standing straight up. When I was on top of the case wiggling around a bit, it almost tipped over so I jumped off. A quick solution for Nikao would be just moving the feet outward a bit.
 ????
????
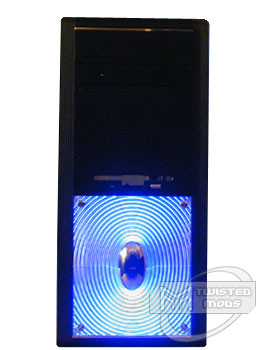
Starting on the front bezel, I was very impressed! The front bezel of the Union is composed completely of black plastic. The top of the bezel rounds into the top panel which looks really ?clean.? From outside of the case, four 5.25? devices and one floppy drive may be accessed. One thing that I have noticed about all of Nikao?s cases is that no matter how tall the case is, they almost always have more externally accessible 5.25? bays. While this does seem like a shocker, some people do NOT use floppy drives anymore, but there is no way to cover the 3.5? bay because it?s built into the bezel. You can pretty much forget about mounting anything in a 3.5? bay, except of course the floppy. Nikao often includes their pre-stealthed 5.25? covers which make it so you are no longer required to paint your drive fronts! Simply mount the cd-rom back a bit further and throw their bay filler in there. The button on the bay filler worked with both my generic 48x cd-rom and my 10x Hewlett Packard CDRW. Another cool feature with the Union is its dual USB connectors located on the right side of the front plastic bezel. I can guess that the connectors to the motherboard are a pain in the ass to install (pin by pin), but this is often a useful option to many users! If this does not seem like enough already, the bottom front of the plastic bezel is completely amazing. It is composed of a clear piece of acrylic that covers a sweet silverish spiral design and houses both the chrome power and reset buttons in the center. And have no fear, anyone?s fat fingers will have NO problem turning a system on and off in this case! The buttons are fully exposed and easily accessible! According to Nikao?s website, the front spiral design lights up with a blue led housed above and below the set of buttons which makes an extreme lighting effect! To test this, I quickly got my tester power supply out and hooked up the power led through the included molex power led converter. Indeed this case did look VERY slick with the front blue lights! Another quick thing I noticed on the front bezel was the great use of ?thick chrome? over the power button, reset button, floppy button and all 4 screws holding the front piece of acrylic on. On a little closer look, the chromed screws had a couple spots where you could see the chrome bubbling. This may concern you, but it is not too noticeable. Right as I went to pull the side panel off, I though that something was missing from the front ? air vents! Does this case NOT have intake in the front? It does, but the slot for cold air is on the BOTTOM of the plastic bezel and it?s VERY thin. I would doubt if the slot even allows ANY air on a carpeted surface. Mod that sucker!
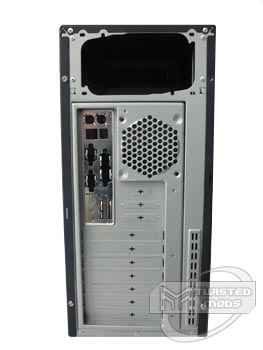
A look at the texture and color on the top and side panels had me a little nervous. The color and paint had no flaws, but I didn?t really have any feelings for the ?smooth? texture versus the rough texture on the Antec cases and Addtronics cases. Another thing I noticed were the cooling holes located near the top and bottom of both side panels. I guess you might actually utilize these with such a lame intake feeding hole ? haha! A couple of cases I have seen with holes like these don?t look too bad, especially when it is lit inside because the holes let light out as well. As I scanned one last time, I noticed that the color between the side panels and the front plastic bezel are a tad off. The plastic bezel appears greyer while the side panels actually represent black. Just thought I might point that out :) . I swung around to the back of this case and was definitely impressed. The first thing that I noticed was the removable rear panel. This makes installations, upgrades and removal of hardware quick and easy! One of the #1 complained about issues in cases is the lack of a removable power supply plate. Unfortunately this case did not have a removable PSU plate, but you may not need one if you take the time to remove the rear panel with the motherboard before removing the PSU. Like many other cases, this one provides room for 7 PCI devices if needed and includes the standard IO panel and old-school hookups for serial, etc. like on the older p1 systems. The last thing that really impressed me on this case was the 80mm exhaust. Positioned near the heatsink, this 80mm exhaust would provide EXCELLENT exhaust cooling on top of the other two power supply fans on an Enermax, but this is not why I was in such ?awe.? FINALLY, manufacturers found out that you can even put an 80mm exhaust there ? took them long enough!
 ?????
?????
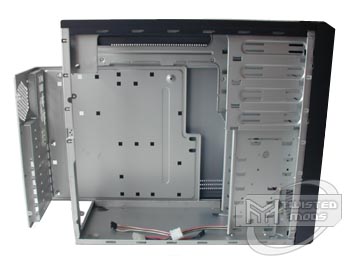
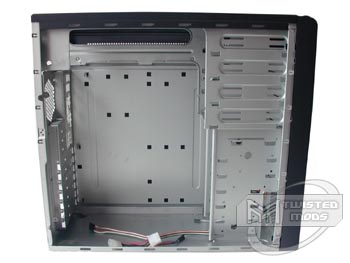
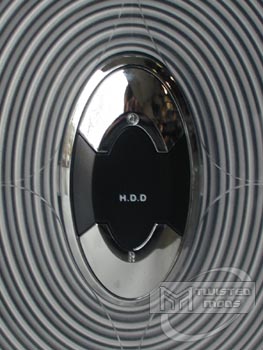
After unscrewing the chrome plated thumbscrews, I removed the side panel and glanced inside. The heart of the case is often the most important aspect of a case ? it can make or break a reputation. Inside the case, I did not see even ONE pre-installed fan, just empty holes. Starting near the front, the 5.25? devices use a screw-in design rather than the most popular and preferred ?rail? install design. Whether you are at a LAN or at home, plan on keeping a screw driver near by ? to uninstall devices you have to remove both side panels and remove the screws on both sides ? same with the hard drives! Speaking of hard drives, the Union is capable of housing six hard drives which is MORE than enough for a home PC! After looking at the motherboard tray, I noticed that this case uses the ?clip-mount? method for mounting the motherboard to the tray, which I often discourage but this case was different. After taking the time to remove the motherboard tray and install the clips from behind, I was pleased to see how well they actually FIT and stayed in place. The rest of the inside seemed fairly standard ? installation of components is very similar to most other cases and the design for holding the motherboard tray in place is two screws from the inside of the case. Very sleek and easy!
Overall I was both impressed and discouraged. I was impressed by the great steps that Nikao took to improve their newer line of chassis? and also impressed by the awesome lighting effect on the front. It seems as though all manufacturers are starting to light the front of their cases as a stock feature. It has turned into a case trend?either way it looks good. Color options other than blue would be appreciated, but is nothing a small solder job wouldn?t fix! I was discouraged by the cheesy cooling with this case. There were only TWO fan holes, which were both very restrictive and would eventually, after dust build-up, not be effective at all. For these very reasons I would not recommend this case for anything above an AMD 1ghz because of heat problems, and Intel 2ghz chips. While this case?s appearance is impressive, it?s the small details that count! This case can be picked up for $100.00 which is a bit extreme for a STEEL chassis which I would imagine being priced at around $60.00! Either way, I wouldn?t have much of a problem recommending this case for home pc users or even servers, but if you are planning on a great over-clocking case or case for modding ? keep searching boys!

More Pictures on Page 2
Next Page 2/2 >


