
The chassis, which houses the working components of a personal computer, is one of the most diverse parts of the personal computer in today?s computer industry. Just as every career starts with an education, every case mod starts with a well chosen chassis. Choosing a chassis, for some, consists of searching for the cheapest price possible for a chassis with a power supply included. You might be thinking that cheap is the best way to decide your next chassis, but there?s more to a chassis than cost. Believe it or not, a chassis actually does have the ability to lower system temperatures, make mobility finally an option, or simply stick it on TOP of your desk instead of that clunker you?ve currently got. For example, if you are the type who enjoys gaming at a friend?s house or at community LAN parties, your biggest concern would be weight ? the lighter the chassis is, the easier it will be to take your gear around town without straining a muscle. You may also desire a lighter case if you lack large amounts of muscle mass like myself! For the big pc enthusiasts who prefer overclocking and high performance/high heat output systems, weight might not be such an issue anymore but the size of the case certainly matters. Not only does a bigger case entail more fans, but more room for your fans to get around and more room for any bulky water-cooling components you may have which would normally block airflow in a smaller chassis. Keep in mind, there are other factors to account when choosing a chassis as well as just size and weight. A list of factors includes; number of bays (both 3.5? and 5.25?), number of power supplies (redundant capable or single power supply), color and material. Chassis? usually come in two standard materials which include you?re everyday and most often seen steel as well as the more appealing and outperforming aluminum. Those users who were earlier described as ?pc enthusiasts? often choose an aluminum construction over steel because of its ability to dissipate heat a bit better. Steel chassis? are usually renowned for harnessing heat inside the box which later relies on the actual intake and exhaust fans to get rid of it whereas aluminum has the ability to take the heat which is being circulated inside the chassis and transfer it to the outside of the chassis. This usually results in lower case temperatures and not so much reliance on the case fans, rather everyday room temperature air. Today, HardwareCooling.com was able to let us at TwistedMods take an in-depth and personal look at SkyHawk?s Aluminum AL4378D-SL chassis. In the aluminum chassis industry, there are three main players ? Lian-Li which is known for their more blocky, expensive but elegant cases and there is CoolerMaster who also creates some GREAT looking cases which are quite spendy as well. The last and certainly not the most forgotten would be Skyhawk. SkyHawk is known for their light cases which are beginning to become a bit more exotic in the fronts with custom lighting and easy access panels. These are usually much more inexpensive than LianLi and CoolerMaster.
After speaking shortly with Hardwarecooling.com, we had finally come to the agreement that they?d ship us the Skyhawk case. Straight off of their site, I already knew that this case was not exactly the most attractive of them all, but seeing as it was only 0.8mm thick, I had a gut feeling which said that this just might be one of the lightest cases I had ever touched. Sure enough, the minute this box arrived on my front porch, it felt like an empty box. This prompted me to open the box up and check it out?after unpacking the chassis from the Styrofoam, I could not help but notice how light this thing was! I quickly pulled out my trusty scale and ? are you ready for this? This case only weighed in at 13lbs. I am sure you will hear this during the entire review, but this case is even lighter than our previous 17lb Skyhawk cases and at the time of those reviews, I thought those were light! The first thing this tells me is that Skyhawk created this case with ONE intent ? LAN parties. Transporting this case to and from your house will be a piece of cake compared to normal 25lb steel chassis?. Keep in mind however, that although lightness is great ? this invites easy denting and less protection for your hardware. Keep this case in its original box during transport and it should be fine. After pulling out my tape measure on this case, I did find that this case is just about the same size as any other mid-tower chassis. The Skyhawk AL4378D-SL stands 16.5? tall, 8? wide and about 19? deep. This does seem a bit small; we?ll just have to see what kind of cooling and bays it?s got on the inside before making any judgments. If you?ve read any of our other chassis reviews before, you can guess what comes next. If you haven?t, usually I conduct a strength test on each chassis by putting all 115lbs of my body weight on the top of this case as I wiggle and see how each chassis survives. Seeing as most everyday chassis? are composed of 1.0mm or thicker material and this case is only 0.8mm thick, I had to skip this portion of the review. It is obvious that this case would not be for everyday wear and tear as it will dent, bend and flex easily.
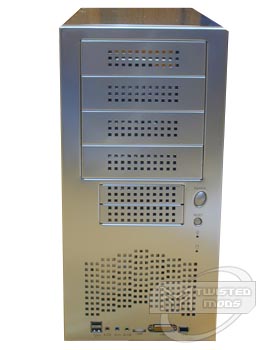
A quick look over the front of this case had me in a mixed-state. After checking out the actual texture on this case, it is quite different than the typical Lian-Li dull, brushed aluminum. Instead, Skyhawk decided to try something different on all parts of this chassis with a shiny, almost mirror-like, brushed finish. In my honest opinion, the shiny look does add a bit of custom characteristic to the case, but also looks a bit cheesy compared to most brushed finishes. Starting at the top of this case, I was able to see four 5.25? externally accessible bays as well as two 3.5? externally accessible bays. On each of the bay covers are three rows of square cut-outs to give this case a bit of ?dimension? as I call it. It?s just another way to spice things up while possibly allowing a little more airflow. Immediately to the right of the two 3.5? floppy bays is the power button as well as the reset button. Below those two system buttons is a green 3mm power LED followed by a red hard drive activity LED. The size of the buttons actually surprised me. As we all know, some cases come with a reset button that seems like it requires a pin to reset the system, but Skyhawk was aware of sizes when they designed this chassis. The reset is easily activated by even a press of the thumb, and both buttons are just about the right size to keep from having the case look like it has oversized buttons. Centered, about two inches below the lowest 3.5? floppy bay is this chassis? intake airway. Whereas most cases these days pull air from the BOTTOM of the case, the AL4378D-SL has a uniquely designed arch with those previously seen square cut-outs for an added effect. Without testing, an educated guess says that the square cuts are actually just small enough to allow a good amount of airflow without pulling huge amounts of dust into the case. The next thing I noticed about this case, which is definitely one of the most noticeable features, is the front access panel, located along the bottom edge of the front bezel. On the front bezel of this chassis is a panel which includes two USB 1.1/2.0 ports, microphone, input and output jacks, volume control, gaming port and the ever-so-popular Firewire port. Many people take advantage of the front access panels these days, ever since the big fad with digital cameras (USB), digital video cameras (Firewire) and various other ports for gamers who prefer not to wrestle around the back of their computer just to plug in a set of headphones or a microphone for voice chat. One small detail which I noticed as I was getting ready to turn the case around are the small logos just below each of the ports on the front access panel which make it easier to figure out what plugs in to each of the ports?this is very important with newer users who are not so familiar with computer ports.
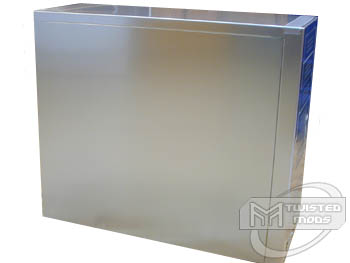
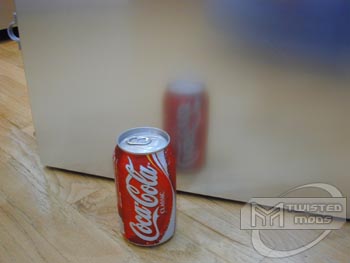
Finally, I had the chance to switch around to the top and both side panels of the chassis. I could definitely not help but notice the reflection in this case ? hence the reason for a couple of reflections in the review pictures. I do not find the shiny texture appealing, but some may find this to be unique and possibly add a different effect with chrome/silver mods being done inside the case (seen through a cut side panel). Again, the texture on each of this chassis? sides was extremely unusual. It was not easily seen like on many other brushed aluminum cases, but seemed like it was brushed a little bit lighter which made it only noticeable when I put my face about 2 feet from the case. Any further and it simply looked like a shiny chassis. You can see from the picture with the Coca Cola can, just how shiny this case is! As far as weight is concerned, the side panels on this case were virtually weightless. They're so light that I am almost able to play Frisbee with them, which is great if I ever get board at a LAN party. Although these panels were virtually weightless, I did have a hard time believing how easily they were able to bend with even the slightest amount of pressure. Throughout all three sides of the chassis, I did only notice one flaw which was located in the rear portion of the top panel. Just about a half of an inch from the rear of the chassis was a small dent where it looked like the screw (on the back panel) had been pushed on slightly which resulted in the top panel having a small dent outward. This, however, would remain almost unnoticeable had I not been LOOKING for things like this.
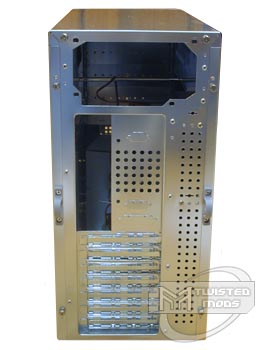
Around to the back bezel of this case, I was not really impressed. Just like any other mid-tower, this chassis had nothing more than any other mid-tower chassis I had seen before. Starting from the bottom up are seven PCI slots, the I/O panel cutout, power supply port as well as a whole cluster of little round holes wherever something wasn?t. Seven PCI holes are fairly standard for any case and motherboard nowadays, unless the motherboard you are dealing with is mini-atx or mini-itx. This allows for a good amount of system accessories from Firewire cards, to USB cards, graphics cards, sound cards, network cards and more. Included in a box of goodies which was located inside the case was a standard I/O port for ATX motherboards, but what about the AT motherboards? Have no fear; those old useless Pentium motherboards have a place in this chassis as well, for Skyhawk has not forgotten to include the extra necessary ports (like an additional serial and parallel port) which are located just to the right of the I/O plate. Normally the previously reviewed Skyhawk cases, like the Jupiter and galaxy both had a 60mm exhaust fan next to the I/O plate as well, but cutting costs was obviously in mind when SkyHawk created this case. Although the holes for mounting a 60mm fan are there, I guess they expect you to spend extra dough on a nice 60mm fan and place it in there for the extra cooling that might be needed. The last thing which is located on the rear bezel of this chassis is the Power supply hole. As you may know, I can not stand having a power supply plate that is not removable. Without a removable power supply plate, removing or switching a power supply could be hard without removing the motherboard to avoid bumping the heatsink. Why is bumping a heatsink such a big deal? Well, if you have ever owned an AMD processor, you might know that they are easily damageable with even the slightest touch that might damage the processor?s core. This is one of the disadvantages of this case which has immediately come to my attention ? removing an entire system just to switch the power supply out is just way too time consuming and risky for me ? Skyhawk could have easily fixed this problem with a simple removable plate which screws onto the back of the case and allows you to pull the power supply from the rear of the case after all cables are unplugged from components inside the chassis.
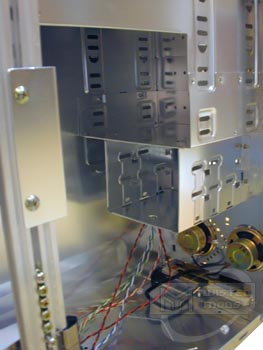
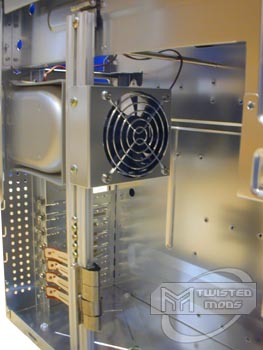
Removing the side panels on this case, to access the inside was a synch! I simple unscrewed the two thumbscrews and hooked my finger around the little plastic ring attached to the side panel (actually located on the rear of the case). With a short tug towards the back of the case, the side panel lifted right off with ease. After opening the side of the case, one word came to mind ? CLUTTER. Right off the bat, I was able to spot a CPU exhaust system which has become very frequent in many Skyhawk cases. Basically, the CPU exhaust is a piece of ducted plastic that has an 80mm fan which is held about 2? from the processors heatsink, and wraps around to exhaust through those many holes in the REAR of the case. The 80mm fan on the duct is powered by a 12vdc molex connector. This, in theory, lowers case temperatures by pulling heat off the heatsink before it gets thrown into the case as well as possibly lowering processor temperatures by assisting in airflow through the heatsink. The second item which I noticed right away is the chassis rail. If you are unfamiliar with a ?chassis rail,? you most often find these aluminum bars stretched across the inside of many rack mount chassis?. Connected to the chassis rail are seven funky looking ?clips? which actually apply pressure to the edges of any extra cards on the motherboard (PCI, AGP, ISA, etc.) to prevent them from coming loose during transportation. Often times, through transportation, a video card comes out of the AGP slot, just enough to cause lock ups or keep the monitor from being detected. On the chassis rail, you simply take a Philips screwdriver to the many screws which are found amongst the center of the rail, position it behind a chassis rail clip and screw it in (which gradually pushes the clip towards the cards.) If you do not enjoy this feature, or plan on modding this case without seeing a huge metal bar behind the window, have no fear, simply unscrew each of the screws at the top and bottom of the rail and you are home free! You might be asking yourself how you would install a huge motherboard with this obstacle. Once again, unscrew the ONE screw at the bottom of the rail and the hinge on the top side of the rail will allow you to flip it up during installation! This feature is absolutely great for LAN gamers who do not mod, because they are constantly moving their chassis and system which results in loose components. With the chassis rail installed properly, a user can significantly reduce the risk of loose system hardware. One more item that is found, attached to the chassis rail is yet another cooling fan, 80mm in size and also powered by a molex connector, this fan is places parallel to the front and rear of the case to help move any air from inside the case in the front, around to the rear where it can finally be exhausted. I am not sure how helpful this would be, because I would want the fan to blow onto my motherboard?s cards, but the chassis rail clips are in the way! This could be seen a small design flaw on SkyHawk?s part.
Smaller, everyday case items are also seen inside this particular chassis. In the front-inside of the case, you will find two system speakers. Usually a chassis consists of one system speaker which is why I really do not understand why two would be anymore helpful! Just below the two speakers is a HUGE PCB which is actually the rear side of the front access panel which is seen outside the case. To help control the hundred or so pins from the back of the PCB is a special cable which goes from the PCB to a PCI plate which is placed in a PCI slot on the back of the case. Seen from the OUTSIDE of the case, in the rear, are audio cables, USB, Firewire and gaming port which SkyHawk expects you to plug into the back of your motherboard. This not only creates a little MORE clutter inside the case as far as wiring goes, but if you only have two USB connectors for example, you must plug ANY USB devices into the front of the case now, rather than have the option to plug mice into the back traditionally. I also noticed that the front of this case has no intake, what-so-ever! How is this case supposed to bring new, cold air into the case if there?s no fan to assist it?! As far as drives go, I was very disappointed to find out that this case only has the capability of housing three 3.5? devices. If you decide to throw a floppy drive into the chassis, you only have room for two hard drives total. Each of the three 3.5? devices and four 5.25? devices are secured into the chassis by two screws on each side of the racks inside the case. Screwing in a motherboard in this chassis was fairly simple as well. Rather than having stand-off clips that attach to the motherboard tray from the backside, Skyhawk has resorted to a more secure and traditional screw in stand-off style most often seen in all chassis?. The screw in stand-offs make me much more comfortable knowing that each of those stand-offs is going to have to unscrew before the motherboard falls rather than have each of the clips simply pop off. The last thing I noticed about this case is the thumbscrews which can be found on every part of this case. From the side panels to the PCI covers, Skyhawk has made every removable screw in this case tool less so any system building during a LAN party can be easily done without asking any buddies for tools!
After taking a detailed look at SkyHawk?s Aluminum AL4378D-SL chassis, I guess the saying stands true, ??you get what you pay for?? Seeing as this case can be picked up for only $69.99 (without any power supply) from HardwareCooling.com, you can?t really expect a top notch quality chassis with flawless design. This case is certainly the lightest case I have seen do date, but is easily the flimsiest and least strong. As long as you plan to travel with the chassis inside its original box during any transportation, strength should really not be a problem. On this chassis, I thoroughly enjoyed the easy access panel in the front of the case which featured two USB ports, Firewire, game port, sound and volume control. This allows a user to easily install any peripherals to their system without the hassle of digging around to the backside of their case to find the connector. Aside from this cases lightweight and convenient front panel, this chassis did however have quite a few downsides. To start, this chassis did not include a removable PSU plate or motherboard plate. I could not imagine using this chassis for my everyday case without a removable motherboard tray ? having all the clutter inside the case like the chassis rail and cpu exhaust fan would be too much trouble for me! Another thing I did notice with this case is the lack of intake of cold air. Unfortunately, Skyhawk thought it to be a little bit more important to install a second system speaker rather than an intake fan which could eventually create severe cooling problems in the chassis. One unique thing that I found interesting was the use of a chassis rail on a tower PC. The chassis rail, which applies pressure to any motherboard card?s, is most seen on rack mount cases and very rarely seen on any other type of chassis. I was very surprised to see this feature on the case, especially seeing as the case still remained so light! As I?ve said before, if you see any interest in this case for a LAN box or a possible mod project, head on over to HardwareCooling.com and pick one up for $69.99.


More Images on this product can be found on page 2
Next Page 2/2 >


