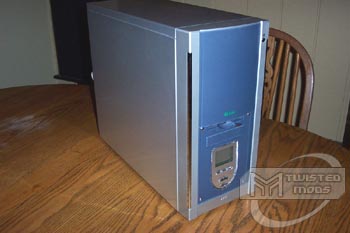
The aluminum case market is a hard place to compete on. The case types are new, they?re not widely used, but they?re great. Skyhawk USA shows us that compared to any competition; they can more than hold their own. The case I reviewed today is probably one of the most impressive cases I?ve ever handled, and I?ve handled a lot! Functionability here is tied in with streamlined good looks and a load of features! Throw this all together, give it killer color scheme and an awe-inspiring front panel and you have one of Skyhawk?s newer cases!
Things I look for in a case would probably include how much room there is, how many useable functions does it have, how well does it serve its purpose, and how attractive is it? This case met most of my criteria with high points and leaving me thoroughly satisfied! This is an aluminum chassis with four 5.25 drive bays that are open and one 3.5 drive bay that?s open. On the internal workings of the case there are 3.5? bays all the way to the base of the chassis. It?d be a better idea to locate your hard-drive towards the bottom of the case because there is a place for an 80mm fan towards the front-bottom area of the case. This will provide more-than-adequate airflow through your chassis. This case also has a nice design to it mechanically; the sides and everything are extremely easy to dismantle. I had no trouble at all installing a system, the I/O panel snapped in without resistance and the motherboard was secured with ALL of the screws. Managing to get all of the screws into a motherboard is extremely rare now-a-days. The case came stock with handles on the back of the chassis side-panels for removal and thumbscrews to secure the side-panels with. This makes for easy dismantlement; I mean really easy, taking the side off this case is almost a pleasure. Some other cases have the sides on so tight that you have to grab and pull and end up jerking your system which could potentially turn hazardous real quick! Well, let?s indulge on some specifics of this case!

The front of the case is a good place to start because it is one of the most unique areas of this case. The front panel of this case starts out like most others; however, there is no power or hdd LEDs on this case. The activity monitors are incorporated in a unique front panel that is back lighted by a nice blue color. This front panel also stays active when the computer is powered down, the way it does this is there is an adapter built into the case that interrupts the PSUs ATX power cord, and you just plug the PSU into the adapter and the adapter into the motherboard. This doesn?t interrupt the amount of power going into the motherboard either; it just allows the case to take power while the system is off. The reason that this panel stays on is that it has a built in clock. The clock doesn?t have an A.M. or P.M. designation or anything because it runs on a Zulu style clock which goes from 0100 to 2400. You get used to reading it after awhile. Once the system is powered on, however, you have the ability to monitor temperatures with the built in temperature monitor connected to the case. There are two buttons on the front panel where you can switch between viewing the time and the case temperature. The case temperature probe, I found, was much shorter than what you need! The closest thing you can monitor would have you be your hard drive, even though the case is a mid-sized case the probe doesn?t reach all the way back to your CPU for true effective temperature monitoring. You might also want to use this probe for an ambient case temperature reading! Monitoring the case temp would be a good idea because than you can brag about your mad readings to your friend, this case is aluminum so it dissipates heat like nothing! Another thing I like about the front panel of this case is that the writing on the front is on a plastic material which is raised up from the actual chassis itself so it provides you with a nice drop-shadow effect on all of the text! Another thing, in the picture above you can see an LCD and then the rest of the plastic panel, when the case is receiving power this ENTIRE panel is lighted, not just the LCD. I just wanted to clear that up; it really gives a nice affect in a dark room! Moving away from the front panel we have the front of the case itself. No disagreements with how they designed this! There are four rivet-looking chromed screws on the case giving it a nice ?rough? look. They used a smokey blueish color on the front of the case which contrasts the silver/chrome scheme of the rest of the case wonderfully.

If you notice, towards the bottom of the case there is a door which hides all of your human-interface connections. Provided down here are two USB 2.0 compatible ports, one firewire port, one microphone port, and one headphone port! There is also a power button down here for when you power down your system with the front door in the down position. It would be hard to power on a system if you could not get to the button; they provided you with an alternative place to power it on with though which I think is a very good feature! There is however, no reset button. If you think about it though you?re not going to need a reset button if the system is off, and if the system is on then you can put the door back up! The door I?m referring to is explained in more detail in the next paragraph.
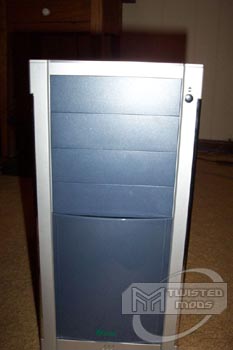
Notice something? Yes, this case has a door on the front that slides up and down the height of the chassis. You can use this to hide all of your drives bays when they are not in use. There is a button on the top-right portion of the case that is used to activate the door. That is another reason the case has to bleed power from the system, to power the door! This thing is one of the coolest features I?ve ever seen on a case! It?s extremely attractive and by the looks of it it?s very reliable. It doesn?t seem like it?d break too easily. The motor for powering the door is located toward the inside bottom of the case, by the 80mm fan port, down by all of the USB and firewire hookups. It?s very small and doesn?t get in the way of anything. It doesn?t make any noise either so it?s not going to bug you when you?re playing with it for hours. That?s pretty much exactly what I did. I do see one downfall about this though, the case door has a good amount of force behind it and it might potentially damage a cd-rom drive bay door if it?s extended and the door is being put into the up position.
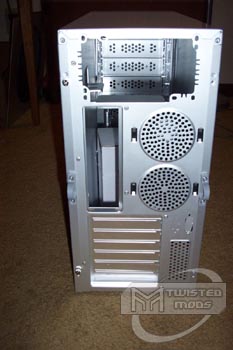
Upon first glance you assume that there is room for two 80mm fans in the rear of the case. Upon closer inspection you will notice that there are no fan holes for these fans. There is a unit for cooling in this case that I see as just?..great. I love it, I think it?s fantastic. Take a look!
This here is a cooling unit that?ll house two 80mm fans that are normal sized 20mm thick. Now once you have these fans in here and route the cords out of their allotted paths provided inside of the unit, you can snap it back into place in the case rear. I found the unit to be very hard to mount into the case though with two fans installed. It doesn?t have much give with all of that reinforcement so you have to bend the chassis a small bit to snap it back in. Once you get it back in, and make sure your fans are pointed in the right direction, the unit can either exhaust air from your CPU area or it can direct air right to your CPU fan for immediate use before it gets heated by the ambient case temperatures. I set up this unit so that it was blowing onto my CPU fan and I found it to lower my temperature about 1-2 degrees C. It doesn?t seem like that much but hey, none is better than some. If it extends the life of your system, DO IT!
Back to the rear of the case! When I was installing my test system I noticed that the I/O panel with the motherboard (Soltek FRN-L) went in without any trouble and held tight. There wasn?t any give to the panel and you could tape on it without disrupting its position. I find this to be important when/if you plug in human-interface-devices often. You?re going to want a steady platform for plugging those in so you don?t damage your mainboard! Other things I should mention about the back of the case is that the power supply goes in the normal direction (so the top of your plug trio is facing towards your ceiling, this is different on some older power supplies or cases that leave them oriented different) which is towards the ceiling. Also, there is plenty of room between the power supply and motherboard once a complete system is installed. You can even remove a heatsink with the PSU in the system. Sometimes you have to remove the psu before you can reach the retention clip and get a good grip to remove a heatsink. Another thing I should mentioned is the nice ventilation provided by the PCI slot location in the case. This is nice if you have a powerful fan in the bottom front of the case. Rather than have to remove all of your spare PCI slot covers to move air, you can let the vents do their job! This makes a case look more ?professional? and ?complete?.
 ?????
?????

 ?????
?????
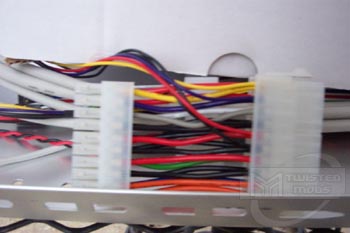
Firstly, I must say something, this interior of this case has this satin finish to it that?s just??damn. Now that that?s out of the way we can proceed. As said before it has four 5.25 drive bays that are external, 1 3.5 drive bay that?s external, and five 3.5 bays that are internal. As you can see also in this picture, the USB cables and all that aren?t bound together. I HATE this, I can?t stand it. It makes installing things so much harder. You have to spend so much time working on it! All of the connections are there though, trust me, I had to hook em all up! Also, you can get a good view of that ATX power adapter from which the case receives its power. It?s a very roomy case for a mid-tower! All of the stud holes are in the exact place for further ease and security of motherboard installation. You can see in the directions that you don?t have much to work with and what you do have is a little confusing. There is so much unnecessary stuff, I mean if they would just bind the USB and firewire connections into one plug it?d be great! Hey, at least they work though right? Also, if you look close enough you can see that they spelled motherboard wrong on the directions, so who knows if they?re accurate anyhow?
 ?????
?????

In concluding I?d have to say that I?m thoroughly satisfied with this case. I find the functionality of it beyond what?s required of today?s power user. I think it meets all criteria needed for a ?good? solid case. I would recommend this case to anyone who wants a sharp system, cool features, and reliability. The reliability comes from the exact measurements put into this case for ease of motherboard installation and the accuracy of the design. I think it meets the needs of most people from the amateur case builder to the hardcore case modder. Anyone will be pleased with this case.


