|
Cleaning Those Cables
Page: 2/3
The Dirty Work
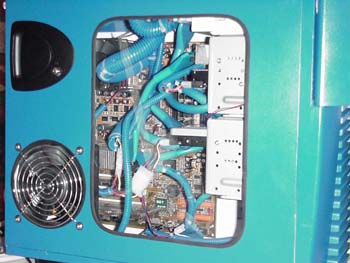
The picture below is what we will be working with today. As you can see, it?s quite the mess already, and will provide us with hours of cable cleaning fun! 
The first thing we want to do is work with the analog or digital (depends on your system) CD Audio cable. These are the ugly grey cables that come from your sound card to your optical drives. My personal favorite way of taking care of those guys is running them back under the card, and up through the gap between your motherboard and the other cards on your PCI and AGP bus. Continue to run it up, around your processor, and across to each one of your optical drives. Now just put some zip ties around both those cables, and secure them together. The picture below shows the idea in more detail. 
The next thing we want to do is start with the Split Loom around our PSU cables. Disconnect all your PSU cables from the devices, and just to be safe, disconnect that power cord from the PSU. I started with the ATX power connector, and moved on from there. The process is simple, cut a piece of loom to the length of the cable, place the Split Loom over the cable (using the slit cut down the side of the loom), and secure the Split Loom with zip ties. When you?re done, you should have something that looks very similar to this? 
Continue to do this until all your PSU cables are covered in that shnazzy Split Loom. When this is completed, you?ll have a bunch of cables looking a lot like this? 
Now that all of your PSU cables are looking good, lets plug them all back in. Also, take this time to put some split loom on those cables coming from the fan on your heatsink, video card HSF, and your Power Switch, Restart Switch, and Case LED?s. When you?re done with that, you?ll have something like this? 
Now, let?s work on routing those case fan wires through that pretty little job you got going so far. For the front intakes on my Antec, I routed both cables (I have 2 front intakes) up the side of the hard drive cages, and up to the baybus in my 5 ?? cage. This was easily achieved by wrapping the wire around the hard drive cage clip, which is actually used to release the hard drive cage. This gets the wire out of the way, and no longer viewable from the window, making your case look even cleaner! YAY! As for the rear output fans, nothing fancy done here. Just use zip ties to tie the pair of wires together, and then cover it with some nice looking split loom. These too were routed up into the 5 ?? cage to be connected to my baybus. 
The next step is your rounded IDE and floppy cables. This is a simple process of just plugging those suckers into your IDE devices and your floppy drive. Simple as that! 
Wow! What an improvement over those green ghetto rounded cables, sure does make a difference! Well boys and girls, I think we?re ready to put our side panel back on, and go sport our new clean case. 
< Previous Page 1/3 || Next Page 3/3 > |
||||||||||||||||||||


